This article will help you understand the basics of ALE and
IDocs via a simple do-it-yourself example. We will create a custom IDoc in one
SAP system and then post some business data through it to another SAP system.
Business data will be picked up from custom data dictionary tables.
ALE and IDocs – Part I
ALE – Application Link Enabling is a mechanism by which SAP
systems communicate with each other and with non-SAP EDI subsystems. Thus it
helps integration of distributed systems. It supports fail-safe delivery which
implies that sender system does not have to worry about message not reaching
the source due to unavoidable situations. ALE can be used for migration and
maintenance of master data as well as for exchanging transactional data.
The messages that are exchanged are in the form of IDocs or
Intermediate Documents. IDocs act like a container or envelope for the
application data. An IDOC is created as a result of execution of an Outbound
ALE. In an Inbound ALE an IDOC serves as an input to create application
document. In the SAP system IDocs are stored in the database tables. They can
be used for SAP to SAP and SAP to non-SAP process communication as long as the
participating processes can understand the syntax and semantics of the data.
Complete documentation on IDOC is obtained by using transaction WE60.
Every IDoc has exactly one control record along with a
number of data records and status records. Control record has the details of
sender/receiver and other control information. Data records contain the actual
business data to be exchanged while the status records are attached to IDoc
throughout the process as the IDoc moves from one step to other.
Now, let us understand the ALE Configuration by means of an
example scenario below:
The Scenario
 Data from custom tables (created in customer namespace) is
to be formatted into an IDoc and sent from one SAP R/3 system to another using
ALE service. We need to have two instances of SAP R/3 systems or we can
simulate this on two clients of the same SAP R/3 system.
Data from custom tables (created in customer namespace) is
to be formatted into an IDoc and sent from one SAP R/3 system to another using
ALE service. We need to have two instances of SAP R/3 systems or we can
simulate this on two clients of the same SAP R/3 system.
Creating Custom IDoc type and Message type
All the objects created should be present on both source as well as target system(s).
All the objects created should be present on both source as well as target system(s).
1. Create segments – Transaction WE31
- Create a segment ZRZSEG1
- Add all fields of table ZCUSTOMERS to it
- Save the segment and go back
- Release it using the menu path Edit -> Set Release
- Similarly create two more segments given below
- Seg. ZRZSEG2 – to hold all fields of table ZSOHEADERS
- Seg.
ZRZSEG3 – to hold all fields of table ZSOITEMS

2. Create Basic IDoc type – Transaction WE30
- Create a Basic type ZRZORDER
- Add the created segments in the hierarchy shown
- Maintain attributes for each of the segments
- Save the object and go back
- Release the object using the menu path Edit -> Set Release
3. Create/Assign Message type – Transactions WE81/WE82
- Go to WE81
- Create a new Message type ZRZSO_MT
- Save the object
- Go to WE82 and create new entry
- Assign the message type ZRZSO_MT to the basic type ZRZORDER
- Also specify the Release Version
- Save the object
Thus we have defined the IDoc structure which will hold the
data to be transferred. Next we will understand the
outbound settings, i.e. the settings to be done in the source system.
ALE and IDocs – Part II
In the previous part we created an IDoc structure which
can carry our data from source system to target system(s). In this part we will
understand how to setup the source system to be able to generate and send an
outbound IDoc.
Outbound Settings
Define Logical Systems and Assign Client to Logical System –
Transaction SALE
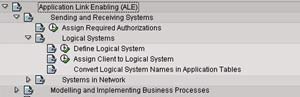
- Go to Define Logical System (See the figure)
- Define a new logical system to identify the local system and save it
- Now, go to Assign Client to Logical System (See the figure)
- Add a new entry
- Specify the client, previously created logical system and other attributes
- Save the entry
- Define a new logical system to identify the partner system and save it
Maintain RFC Destinations – Transaction SM59
- Create a new RFC destination for R/3 type connection
- Specify the target host on Technical settings tab
- Provide the Logon credentials on the Logon/Security tab
- Save the settings
- To verify the settings, Click on Test connection or Remote logon
Define Ports – Transaction WE21
- We need to define a tRFC port for the partner system
- Click on Transactional RFC node
- Create a new port
- Provide a description
- Specify the name of the target RFC destination
- Save the object
Maintain Distribution Model – Transaction BD64
- Click on Change
- Create a new model view
- Provide a Short text and Technical name to the model view
- Add message type
- Specify sender and receiver systems
- Also, specify the message type that we created previously
- Save the Distribution model
Generate/Create Partner Profile – Transactions BD82/WE20
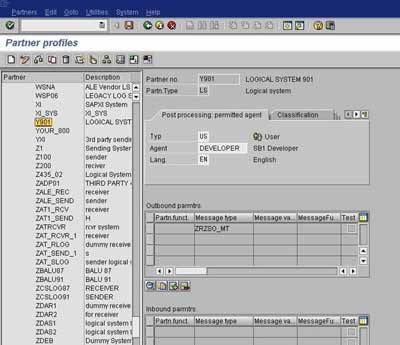
- To generate Partner profiles automatically you may use BD82 or go to BD64 and use the menu path Environment -> Generate partner profiles
- Otherwise, you may use transaction WE20 to create a partner profile
- On selection screen, specify the model view, target system and execute
- The result log will be displayed on the next screen
- To verify the partner profile go to WE20
- Check the partner profile for the target system
Distribute Model View – Transaction BD64
- Select the Model View
- Go to menu path Edit -> Model View -> Distribute
- Result log will be displayed on the next screen
Outbound IDoc Generation Program
Create an executable program ZRZ_ORDER_IDOC in SE38. Below,
I have described the program logic:
- Fetch the data from the DDic tables ZCUSTOMERS, ZSOHEADERS and ZSOITEMS as per the selection criteria
- Fill the control record structure of type EDIDC
- Specify message type, Basic IDoc type, tRFC Port, Partner number and Partner type of the receiver
- Fill the data records
- Define structures like the IDoc segments
- Fill the structures with fetched data
- Pass the segment name and the above structure to the appropriate fields of EDIDD type structure
- Append the EDIDD structure to the EDIDD type internal table
- Now, call the function module MASTER_IDOC_DISTRIBUTE and pass the IDoc control record structure and data record table
- Commit work if return code is zero
- Function module returns a table of type EDIDC to provide the details about generated IDoc
- Display appropriate log
Thus we have completed sender side configuration required
for ALE. In the last part, we will see how to configure the receiving system to be able to
receive and post the inbound IDoc.